Blogs
Capturing and Transcoding Video
Although it's relatively easy to find almost every viral video online on sites such as YouTube, in order to include videos in my presentations, I need to capture them to my computer, convert (transcode) them into a common format, and then assembly them into short (5 minute) video reels. There are a lot of different tools you can use. Here are the ones that I have found work best for me.
Capturing Video to Your Local Computer
The first trick is to save the video from the web onto your computer. Although some sites store video in MPEG or AVI format (in which case you can simply right-click and save the file to your machine), many use Flash video (.flv files). To capture these videos, I use a website called KeepVID. Go to the KeepVID site and then follow these steps:

- In another browser window or tab, locate the video you want to capture (such as on YouTube).
- Copy the URL from YouTube into the field on KeepVID.
- Select the website in the adjacent drop down list.
- Click the DOWNLOAD button.
- Click the Download link.
- When the File Download dialog box displays, click Save.
- In the Save As dialog, select an appropriate location and filename. Be sure to add the .flv file extension.
Transcoding Video
Once you have saved the video to your computer, the next step is to convert (transcode) the video into a format that you can use. The tool you chose depends on the format you've downloaded, and again, I have a few favorites that work well for me.
Converting Flash video (.flv) files
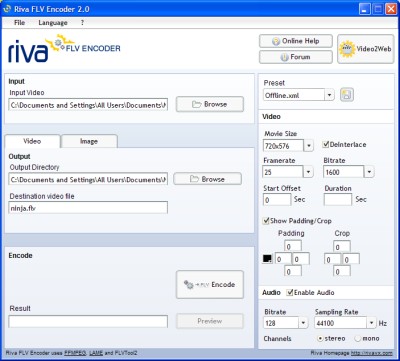
In order to include videos saved as Flash video (.flv) files into video reels, you'll need to first convert them into some other format, such as MPEG. For this, I use the Riva FLV Encoder, which you can download free from the Riva website. After downloading and installing the software, follow these steps:

- In the Input Video field, locate the .flv file you want to convert.
- In the Output area, specify the folder where you want to save your video.
- In the Destination Video File field, specify the name you want to use to save the converted video. Note that Riva uses the same name as the original file (including the .flv file extension). Be sure to change the file extension from .flv to the format you want (such as ,mpg). That's all it takes to specify the destination video file format.
- Click the Encode button.
You can play with the other settings if you wish. Also note that you can use Riva to convert between other formats as well, by simply specifying the appropriate input and output file extensions. For example, I have successfully used Riva to convert from AVI to MPEG and you can also use it to convert from various video formats into Flash video as well.
Converting QuickTime (.mov) Files
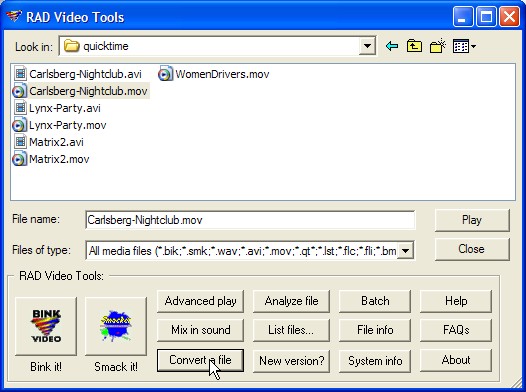
QuickTime files can also pose problems, since the tools I use to create my video reel compilations don't accept .MOV files either. My software of choice in that case is the RAD Video Tools collection, which you can download free from the BINK Video website. After downloading and installing the software, follow these steps:

- In the RAD Video Tools dialog, locate the file you want to convert.
- Click the Convert a File button.
- In the Blink Converter dialog box, click Browse to specify the folder in which you want to save the resulting video file.
- Click the Output Type button and then specify the output video type (.AVI is the default).
- Click the Convert button.
- When the Video Compression dialog box displays, simply click OK to create an uncompressed video, or select the codec you want to use for compression and then click OK.
Again, you can play with the various settings if you wish. Also note that the RAD Video Tools can also convert other video file formats, such as .ASF, and that Smacker, one of the other RAD tools, can be used to simply compress videos.
Creating a Video Compilation Reel
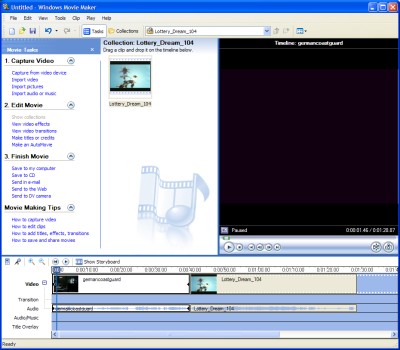
Although there are lots of very good consumer-level video editing programs out there, you've already got everything you need on your Windows-based computer. Windows Movie Maker has everything you need to compile your collection of videos into a single video reel.
Simply work your way through the Movie Tasks bar on the left side:

- Import the video files you previously converted into MPEG or AVI files.
- Drag-and-drop each video onto the storyboard.
- Rearrange them into the order in which you want them to be viewed.
- Use the video transitions to add fades, dissolves, and so on between clips, as appropriate.
- Finish the moving by clicking Save to My Computer.
Of course, you can use other Windows Movie Maker tools, such as the Split tool to cut out unwanted portions of the video clips and the Titles tool to add titles, credits, and captions. But I'll leave it up to you to learn more about Windows Movie Maker.
copyright © 2001–2024, David S. Cohn. all rights reserved